
EXTERIOR LAMPS — Rear Combination Lamps — Bulb Replacement / Removal / Installation
EL-59prose procedureUnverifiedFixing-nut torque text shows '2.9 - 3.8 (0.3 - 3.9)' in the source — the kg-m value 3.9 is likely a typo for 0.39 (the conversion factor matches 2.9-3.8 N·m). Captured both representations.
Bulb Replacement
NOTE
LHD and RHD versions have the following variations:
Stop and Tail
Rating12 V — 21/5 W
LHDTop Both Sides
RHDTop Both Sides
Turn Signal Lamp
Rating12 V — 21 W
LHDNext to top both sides
RHDNext to top both sides
Fog Lamp (Rear)
Rating12 V — 21 W
LHDBottom LH side
RHDBottom RH side
Reverse Lamp
Rating12 V — 21 W
LHDBottom RH side
RHDBottom LH side
- 1To Replace Bulbs, pull back luggage compartment trim; pinch bulb holder fixing tabs and remove bulb holder.
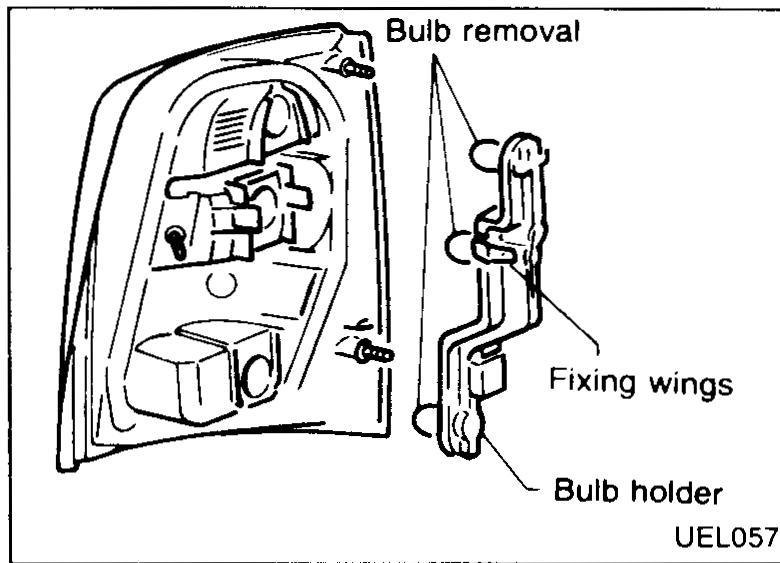 UEL057
 - 2Replace Defective Bulb.
- 3Replace bulb holder ensuring it is locked into position.
Rear Combination Lamp — Removal
- 1Remove battery negative cable from battery.
- 2Remove bulb holder as described above.
- 3Remove nuts from fixing studs.
 UEL059
 - 4Heat mastic from luggage compartment side until it is pliable enough to allow lens unit to be pulled away from mounting.
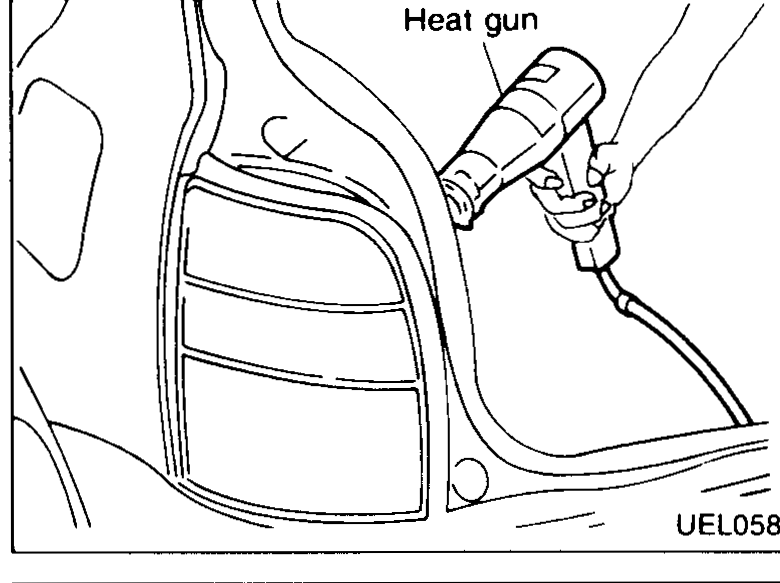 UEL058
Rear Combination Lamp — Installation
- 1Remove all traces of mastic prior to applying new sealant.
- 2Apply suitable bead of hot butyl around lens mounting.
- Hot Butyl should be applied without excess or gaps and must not protrude outside periphery of lens edges.
- Bead joint should be at the bottom of lamp in mounting position.
- 3Fit lamp in position.
- 4Tighten retaining nuts on fixing studs to the specified torques in the following order ①, ②, ③.
- 5Replace bulb holder ensuring it is locked securely in position.
CAUTION
• Take care not to damage surface of lens, rim and coating of vehicle body panel when mounting.
• Do not use organic solvents to clean exterior of the lamp.
| Specification | Value |
|---|---|
| Rear combination lamp fixing nuts | 2.9 - 3.8N·m (0.3 - 0.39 kg-m) |
Rear combination lamp fixing nuts
2.9 - 3.8N·m (0.3 - 0.39 kg-m)