
HEADLAMP — Aiming Adjustment
EL-58prose procedure5 m / 65 mm drop is a 1.3% downward slope, the standard European low-beam tilt. UK 'driving on left' inverts the LH/RH kick of the beam pattern.
Aiming Adjustment
NOTE
Vertical aiming of the headlamp reflector is achieved by adjusting the bottom adjuster screw.
Horizontal aiming of the headlamp reflector is achieved by adjusting the top adjuster screw.
When performing headlamp aiming adjustment, use an aiming machine, aiming wall screen or headlamp tester. For operating instructions of any aimer, it should be in good repair, calibrated and used according to respective operation manuals supplied with the unit.
If aiming equipment is unavailable, aiming adjustment can be performed as follows.
Low Beam
- 1Turn headlamp low beam on.
- 2Use Top and Bottom adjusting screws to achieve horizontal and vertical aiming respectively.
- Main optical axis of headlamp beam can be adjusted by +/- 2° horizontally and +2°/-4° vertically.
- First tighten the adjusting screw all the way and then make adjustment by loosening the screw.
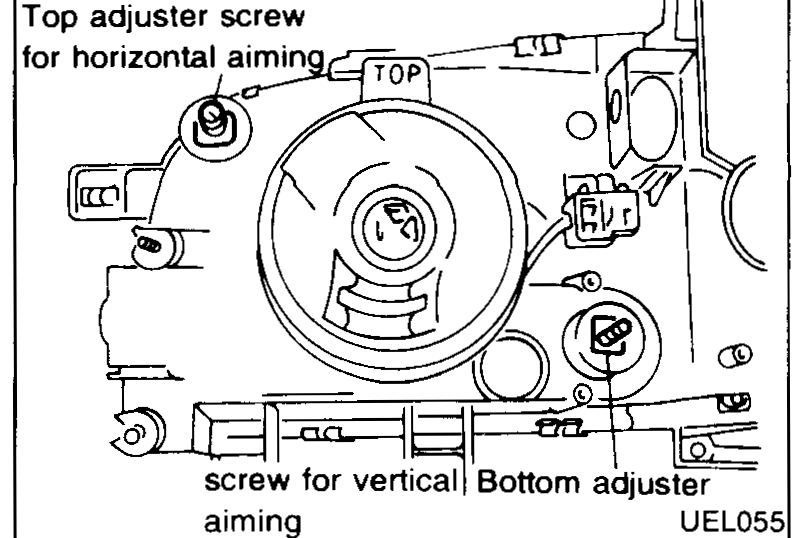 UEL055
Vehicle Conditions
NOTE
1) Vehicle should be correctly loaded i.e. coolant and engine oil filled up to the correct level, a full fuel tank and no other load other than the driver or an equivalent weight (75 kg) placed in the driver's position.
2) Keep all tires inflated to correct pressure.
3) Place vehicle and tester on same flat surface.
• Check specific regulations relating to country for intended use.
Adjustment Procedure
- 1Adjust headlamps so that main axis of light is parallel to center line of body and is aligned with point P shown in illustration.
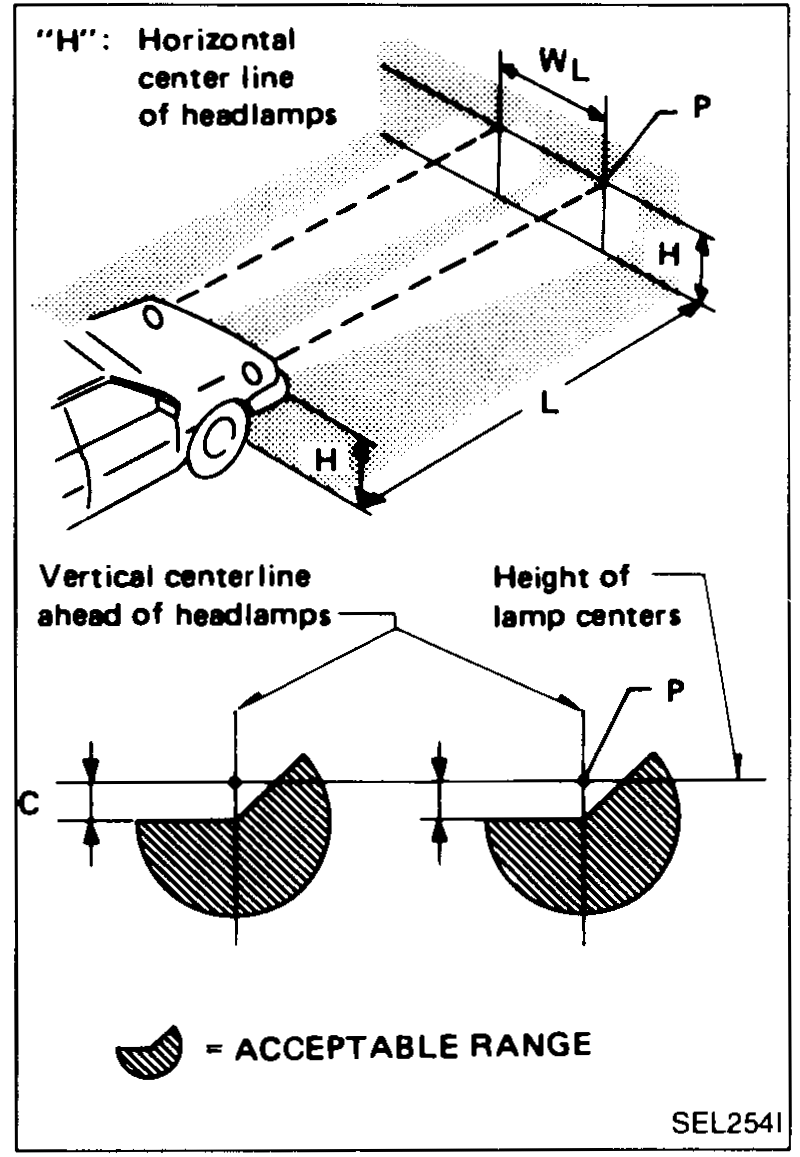 SEL254I
 - 2Figure to the left shows headlamp aiming pattern for driving on right side of road; for driving on left side of road, aiming pattern is reversed.
- 3Dashed lines in illustration show center of headlamp.
| Specification | Value |
|---|---|
| Horizontal aim adjustment range | ±2°of optical axis |
| Vertical aim adjustment range | +2° / -4°of optical axis |
| L — distance to aiming screen | 5m (16 ft 5 in.) |
| C — vertical drop below H | 65mm (2.56 in) |
Horizontal aim adjustment range
±2°of optical axis
Vertical aim adjustment range
+2° / -4°of optical axis
L — distance to aiming screen
5m (16 ft 5 in.)
C — vertical drop below H
65mm (2.56 in)
NOTE
Symbol legend:
"H": Horizontal centre line of headlamps.
"WL": Distance between each headlamp center.
"L": 5 m (16 ft 5 in.).
"C": 65 mm (2.56 in).