
REMOVAL AND INSTALLATION — Installation
AT-7124prose procedureInstallation
- 1Tighten bolts fixing transaxle.
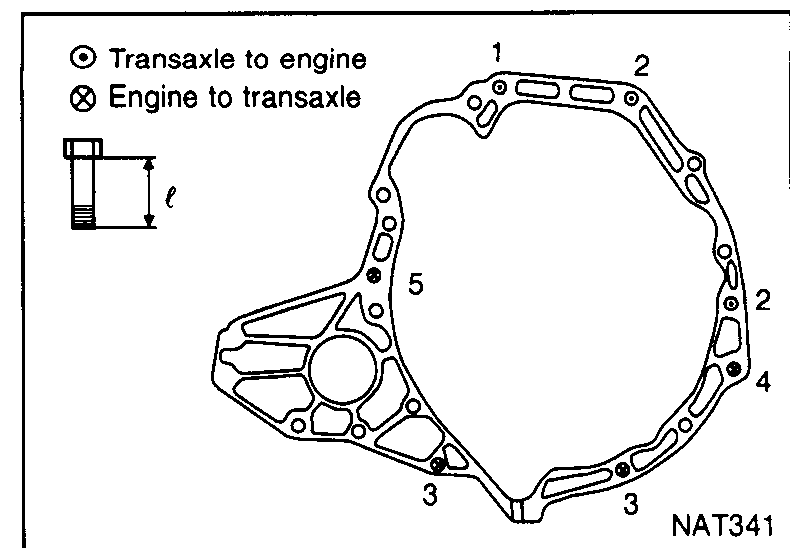 NAT341
 - 2Install torque converter to drive plate. With converter installed, rotate crankshaft several turns to check that transaxle rotates freely without binding.
- 3Reinstall any part removed.
- 4Adjust control cable. Refer to AT-7121.
- 5Check continuity of PNP switch. Refer to AT-7056.
- 6Refill transaxle with CVT fluid and check fluid level.
- 7Move selector lever through all positions to be sure that transaxle operates correctly. With parking brake applied, idle engine. A slight shock should be felt through the hand gripping the selector each time the transaxle is shifted.
 SAT638A
 - 8Perform road test. Refer to AT-7039.
1
Tightening torque — N·m (kg-m, ft-lb)31 - 40 (3.1 - 4.1, 23 - 29)
Bolt length "ℓ" — mm (in)45 (1.77)
2
Tightening torque — N·m (kg-m, ft-lb)31 - 40 (3.1 - 4.1, 23 - 29)
Bolt length "ℓ" — mm (in)50 (1.97)
3
Tightening torque — N·m (kg-m, ft-lb)16 - 20 (1.6 - 2.1, 12 - 15)
Bolt length "ℓ" — mm (in)20 (0.79)
4
Tightening torque — N·m (kg-m, ft-lb)16 - 20 (1.6 - 2.1, 12 - 15)
Bolt length "ℓ" — mm (in)16 (0.53)
5
Tightening torque — N·m (kg-m, ft-lb)63.7 - 73.5 (6.5 - 7.4, 47 - 54)
Bolt length "ℓ" — mm (in)53 (2.09)