
BRAKE BOOSTER — Installation
BR-14prose procedureBrake fluid spec is DOT 4 — never reuse drained fluid.
Installation
CAUTION
• Be careful not to deform or bend brake pipes, during installation of booster.
• Replace clevis pin if damaged.
• Refill with new brake fluid "DOT 4".
• Never reuse drained brake fluid.
- 1Before fitting booster, temporarily adjust clevis to dimension shown. (Does not apply to vehicles fitted with ABS).
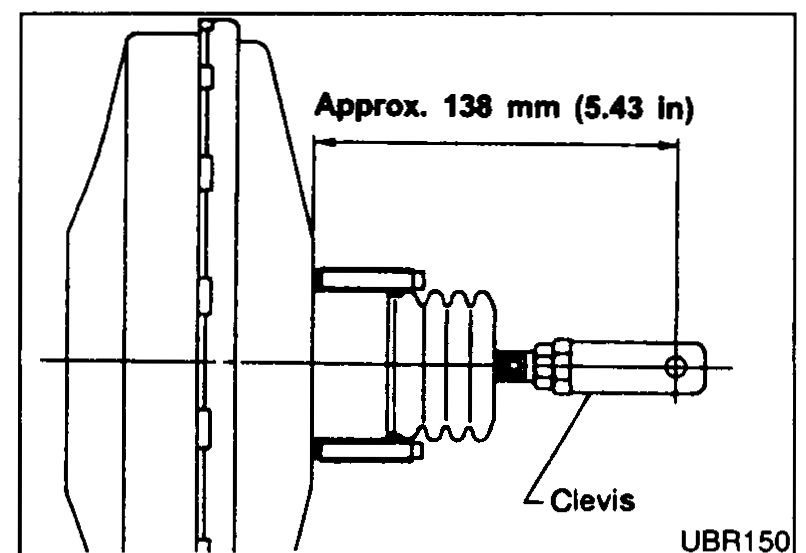 UBR150
 - 2Fit booster, then secure mounting nuts (brake pedal bracket to master cylinder) lightly.
- 3Connect brake pedal and booster input rod with clevis pin.
- 4Secure mounting nuts. Specification: 11 - 17 N·m (1.2 - 1.73 kg·m, 8.1 - 12.5 ft·lb).
- 5Install master cylinder. Refer to "Installation" in "MASTER CYLINDER".
- 6Refit A.B.S. actuator securing nuts and actuator brake tube nuts.
- Tighten A.B.S. actuator securing nuts. Specification: 18 - 20 N·m (1.8 - 2.0 kg·m, 13 - 14 ft·lb).
- Tighten A.B.S. actuator brake tube nuts. Specification: 15 - 18 N·m (1.5 - 1.8 kg·m, 11 - 13 ft·lb).
- 7Bleed air. Refer to "Bleeding Procedure" in "AIR BLEEDING".
- 8Adjust brake pedal free height. Refer to "Adjustment" in "BRAKE PEDAL AND BRACKET".
| Specification | Value |
|---|---|
| Mounting nuts (booster to brake pedal bracket) | 11 - 17N·m (1.2 - 1.73 kg·m, 8.1 - 12.5 ft·lb) |
| A.B.S. actuator securing nuts | 18 - 20N·m (1.8 - 2.0 kg·m, 13 - 14 ft·lb) |
| A.B.S. actuator brake tube nuts | 15 - 18N·m (1.5 - 1.8 kg·m, 11 - 13 ft·lb) |
| Booster face to clevis-pin centerline (pre-fit clevis adjustment, non-ABS) | Approx. 138mm (5.43 in) |
Mounting nuts (booster to brake pedal bracket)
11 - 17N·m (1.2 - 1.73 kg·m, 8.1 - 12.5 ft·lb)
A.B.S. actuator securing nuts
18 - 20N·m (1.8 - 2.0 kg·m, 13 - 14 ft·lb)
A.B.S. actuator brake tube nuts
15 - 18N·m (1.5 - 1.8 kg·m, 11 - 13 ft·lb)
Booster face to clevis-pin centerline (pre-fit clevis adjustment, non-ABS)
Approx. 138mm (5.43 in)
See also
MASTER CYLINDER Installation · AIR BLEEDING Bleeding Procedure · BRAKE PEDAL AND BRACKET Adjustment